Wednesday 27 November 2013

Native Canadian Art Animals’ symbols. Grade 1,2, 3


Native Canadian Art
Animals’ symbols


Animals such as the bear, the eagle, the frog, the butterfly, the wolf, the whale, the salmon, the raven and the owl are very often represented in Native Canadian Art.
The wolf is known for its intelligence, leadership and strong sense of family values as well as for being a great team player. It symbolizes perseverance, intuition and success.
The frog symbolizes peace and rebirth. It holds knowledge and power and is known as a positive spirit driver. The frog is closely linked with femininity and womanhood. Frog designs are often seen on practically everything people use, including house objects, clothing and totem poles where the frog is often seen with its tongue out.


The Bear
Native Canadian people learn from the bear how to fish salmon and collect berries.  Some bears return to the same den for hibernation, for which reason they are associated to home. Bears spend the winter with their young until they are yearlings (one year old), so they are associated to family.  It is believed that bears understand human speech and thought. Black bears are depicted with a short snout, short ears, small tail, and sometimes hanging tongue. Grizzly bears have bigger teeth, particularly the canine teeth, and large claws.


  http://shop.slcc.ca/system/files/image/Bear%20Symbol.jpg

Types of lines. Art lesson for SK


Let’s draw a tree (a song)

Refrain: Let’s draw a tree (2X)
The ground, a horizontal line,
The trunk, two vertical lines,
The branches, many diagonal lines,
The leaves, small, small curved lines;
The flowers, wavy lines,
As the crown of the tree.
Refrain: Let’s draw a tree (2X)
Homework: Read and sing the song above.
Draw a tree as described in this song.

Analogous colours, lesson and worksheet, grade 6 to 10.


Analogous Colours

An analogous colour scheme/group makes everything seem the same colour at first until approached. In general there are 3 colours in a group. Together, they create a smooth passage and bring harmony to your artwork.

There are two ways of realising a passage when colouring or painting. You can use monochromatic colours (shades/ tones of the same colour) or analogous colours. Analogous colours are used by makeup artists, interior, product, graphic, fashion, and flower designers as well.

Analogous colours are colours that are adjacent to each other on the colour wheel, with one being the dominant colour. The dominant colour can be either primary, or secondary.
Orange, yellow-orange and yellow is a group of analogous colours. The dominant colour in this group is yellow, because orange and orange-yellow contain yellow. They are blended nicely in “Sunflowers”, a painting by Vincent Van Gogh.

 To make a group of analogous colours, pick one colour, and then go either to the right or to the left of the colour wheel, to choose the other 2 colours. Imagine the colour wheel as a clock. Number 12 is yellow and number six is violet. For the best results make sure you have in your group a primary colour, a secondary colour and a tertiary colour.

A tertiary color is a colour made by mixing one primary color with a secondary color (red-orange, yellow-green, blue-violet, etc)

Analogous groups of colours are best used with either warm or cool colours.
Your group can also contain a warm colour and two cool colours. It cannot contain two warm colours and one cool colour.
                          
Possible groups of analogous colours when going to the right on the colour wheel:

yellow, yellow-orange, orange ( all three colours are warm colours, the dominant is yellow)


the dominant colour


Orange, red orange, red (all three colours are _________ colours, the dominant is ___________ )


the dominant colour


Red, red-violet, violet (one colour is ________, the other two are _______. The dominant is ___________)


the dominant colour


Violet, blue-violet, blue (all three colours are ________, the dominant is _________)


the dominant colour


Blue, blue-green, green (all three colours are ______, the dominant is ___________)


the dominant colour


Green, yellow-green, yellow (one colour is ________, the other two are _______. The dominant is ________)


the dominant colour


You are going to have the same results if going to the left on the colour wheel. Try it!

You cannot go to the left and to the right of your chosen colour. If you do, you will have two warm colours and one cool colour in your group.
For example, yellow, yellow-green and orange is an incorrect analogous colour scheme. Yellow –green flows from yellow. They are part of the same family, but yellow-orange contains red, so it is not related to the first two colours of your group.

There can also be 4 colours in a group of analogous colours. The pattern to follow when making a group of 4 analogous colours is: primary colour, tertiary colour, secondary colour and tertiary colour. All your four colours should be either warm, or cool. You can also have one warm colour and three cool.

Examples:
yellow, yellow-green, green and blue-green. (the dominant colour in this group is blue)
blue, blue-violet, violet, red-violet ( the dominant colour in this group is blue)
red, red-orange, orange, yellow- orange ( the dominant colour in this group is red)

Monday 20 May 2013

Ancient Egyptian Art
Projects for grade SK to Grade 4
Print making technique
( This is a printmaking technique I have invented especially for children, so they experiment something similar to etching or to linocut, without using "dangerous" supplies.) 

Supplies:
wooden sharpen sticks
Styrofoam plates 
white glossy paper
drawing paper
printmaking ink
(or oil paint)
printmaking roll

Steps we took:
1. Discussing about Ancient Egyptian Art.
2. Analyzing Ancient Egyptian artworks.
4. Drawing an art composition just in line, on a piece of paper.
5. Shading all over the back of the page.
6. Cutting the styrofoam plate in a rectangle shape.
7. Placing the drawing with the shaded side on the plate.
8. Tracing the drawing in red pen. Now, because the back of the paper is all shaded in pencil, the drawing is imprinting on the styrofoam piece.
9. Drawing with the wooden stick, on the styrofoam piece, on top of the imprinted drawing.
10. Applying the ink (or oil paint) to the relief surface with a printmaking roll.
11.Transferring the image on the paper ( in the same manner used for the linocut technique)
* There is possible to obtain about 3 to 4 prints from each plate.


Introducing the Ancient Roman Art

Steps we took:
1. Learning the rules for drawing a portrait front view.
2. Drawing a portrait front view ( for about 1hour )
3. Reading about, watching and discussing Roman Ancient busts.
4. Learning how to work with clay. First, for practicing, they did a small animal.
5. Watching the teacher (me) doing quickly a bust.
6. Working on their own. 
* We have used Natural Modeling Clay.
Time for teaching all of these: about 5 hours.


Saturday 18 May 2013

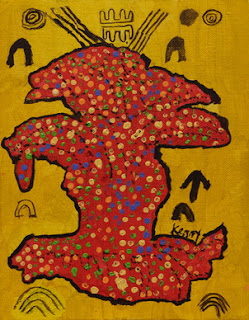
Book Illustration Inspired by the Aboriginal Australian Art

This is a project I did with grade 6-8 at Howlett Academy Toronto.
At the end of every year their poems or stories are published in a small book. This year they wrote stories.
Their art illustrations for these stories are all inspired by the Aboriginal Australian Art. To do their illustrations, students had to write a very short summary of their stories and decide how it could be illustrated in just one painting. Right after, we discussed about Aboriginal Australian Art. We were looking at many Aboriginal artworks and we analyzed their way of painting, the colours and symbols they used.

The steps we took:
Students mixed colours to obtain different hues and tones of: yellow, ocher, brown, orange, red and green. They used black and white, as well. (the specific colours of the Aboriginal Australian Art).
1. Next, they drew on canvas just the outline of each shape, then they
2. painted the background.
3. Every shape was painted in a different colour than the background.

4. Dots were added in or around the shapes with a stick.
5. Every shape was outlined in black with a thin and pointed brush.
6. Aboriginal Australian symbols were added in black, red or brown ink with a thin and pointed brush.
7. At the end, they signed in black ink with a thin and pointed brush.
 8. I did the book cover.